Belgium Endive Trial 2006
Garden Help > Vegetables > Belgium Endive
Summary
Belgian endive can be successfully grown in Santa Clara County as a cool weather green. The plants need to be started in the summer. In late fall, they are harvested, trimmed, and transplanted into damp sand where they are kept cool and dark. Six plants will yield weekly salad greens from December through March, for as long as the weather stays cool.Overview
The purpose of the project was to determine the best timing for planting and forcing Belgian endive in Santa Clara County’s unique climate.
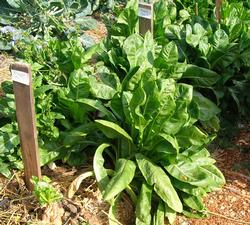
Belgian endive needs to grow in the ground for about four months, then the roots are dug up, replanted in sand, and kept cool and dark while the chicons (the resprouting heads, pronounced shee-COHn) develop. In most places, this forcing phase of growing Belgian endive requires using temperature-controlled rooms, but with our mild winters, we suspected we could leave our bins outside and simply let nature do the work for us.When we grew Belgian endive two years ago, we started seedlings in August and transplanted them in October. We then dug the roots in February for forcing. We only got one chicon harvest because the weather was already warming up by then. We believe that by growing the plants over the summer and starting the forcing just as the weather turns cold, we could get harvests all through the winter.
Soil preparation
The plot was cover cropped with fava beans which were cut down and rototilled into the beds in April, along with some aged horse manure.
Seeding/planting
We started five sets of seedlings of Totem F1 Belgian endive (seeds from Stokes) approximately one month apart throughout the spring and summer. We transplanted the strongest six seedlings from each batch when they were about six weeks old. They were planted in two rows, one foot apart, in a three-foot-wide bed. Each seedling had a handful of alfalfa pellets dug into its hole before planting.
| Started 12 seeds |
Transplanted strongest six |
Roots Harvested |
First harvest |
Last harvest |
|---|---|---|---|---|
| April 5 | May 17 | November 8 | December | April |
| May4 | June 14 | November 8 | December | April |
| June 7 | July 19 | November 8 | December | April |
| July5 | August 16 (replanted August 23) | January 20 | March | April |
| August 2 | September 13 | January 20 | March | April |
The August transplants were disrupted by some unknown creature, so they had to be replanted. The August seedlings did not germinate or grow very well, possibly due to the hot weather at that point. Several plants from both batches were eaten by gophers in January, so we were only able to transplant five plants total from the two batches combined.
Watering
Plants were on drip irrigation which ran 3 times a week for 1 hour each time.
Fertilization/pesticides
No fertilizer, other than compost and alfalfa pellets, was used. No pesticides were needed.
Forcing
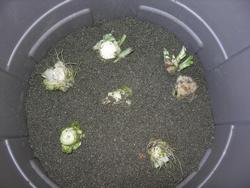
For the forcing phase, we set plastic garbage bins in a place where they would be in the shade all day. It turned out that the plastic of the bins wasn’t totally opaque and didn’t block the light completely, so we covered them with tarps and cardboard to make sure we were excluding all light. It’s important that the chicons are grown in total darkness or else they will be too bitter. They also need to stay cool, so it’s important that they are shaded from the sun.Each bin was filled with sand to the depth of 20", about one and one half 60 lb bags of sand, which was then wetted with two gallons of water. Sand is the traditional growing medium. In our 2003–2004 trials, we compared sand, potting soil, and sawdust as possible growing media—sand clearly performed the best.
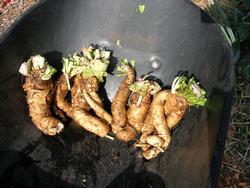
We dug up the plants, trimming off the leaves carefully so as not to damage the growing tip in the center. In the future, I would try to trim off even more of the green leaves than is pictured here. A knife might do a better job than pruning shears did. Any long roots can be trimmed for ease of handling.The roots were planted about 6" apart in the damp sand, with the crown just above the sand.
Harvesting
For the most part, we did not get the tight chicon heads that are sold in the store. Instead, we harvested leaves individually, like harvesting the outer leaves of lettuce instead of the whole head. Perhaps as a result of this, since we weren’t harvesting the whole head and possibly damaging the growing tip, we were able to keep harvesting into April, especially since the weather stayed cool this particular winter. We got about one-quarter to one-half of a pound a week from each barrel, plenty for weekly salads.
There was a surprising amount of variation in how the leaves grew, especially considering that this was an F1 hybrid. Some leaves were tall and skinny, others were short and sturdy. They were all tasty, with that bittersweet flavor that Belgian endive is known for.
Pests and diseases
In the field, the endives were mostly carefree. At the very end, we did have gophers eat a couple of roots, so if you have gophers, be aware that they like endive. Some of the plants bolted, sending up those pretty blue chicory flowers. The roots that bolted seemed to produce as well as those that didn’t, although we didn’t track them carefully enough to be absolutely sure.
In the bins, we had an initial problem with snails and slugs. We put Sluggo in and that seemed to take care of it. Some of the chicons suffered from a brown rot in the bins. Possibly cleaning the green leaves off more thoroughly before planting would help, so that there’s less decaying matter around. Also possibly punching some air holes in the upper part of the bin to encourage air circulation could help.
Summary
Growing Belgian endive is quite easy in Santa Clara County. With our mild winters, we can simply leave our bins in dark shaded areas outside and have crisp Belgian endive salads all winter long, especially if you’re willing to harvest them leaf by leaf rather than cutting the entire head.
Trial lead: Karen Schaffer
Thanks go to the entire Nine Palms team for their assistance, especially in the bed preparation. Special thanks to Jeannie Sunseri, Sally Pyle, and Mike Kent for their assistance throughout the project.


