Growing Transplants from Seed
Starting seeds in pots can give your vegetables, herbs, and flowers a head start before being transplanted into the garden. This makes it possible to enjoy earlier harvests and earlier blooms. Sturdy transplants can better withstand pests, diseases, and difficult weather.
When to start
There are two major planting seasons in Santa Clara County: February–June for warm weather plants and August–November for cool weather plants. Check planting charts and seed packets for optimum timing. General timing guidelines for many popular plants in Santa Clara County are included in the following tables:
Flowers: Cut flower planting chart
Vegetables: Vegetable planting chart (Note that the right-hand column gives an estimated number of weeks “from seed to transplant”)
Some popular plants to start from seed
Late winter–spring: Tomatoes, peppers, eggplant, basil, sunflowers, zinnias
Late summer–fall: Broccoli, spinach, lettuce, sweet peas, nasturtiums
Preparing containers and labeling
Use a good quality potting mix. It should be nicely moist but not soggy. If it is dry, add some water, mix well, and let stand for an hour or so before proceeding.If you are reusing flats, pots, or six-packs, wash and rinse them well. If you have had problems in the past with fungal diseases like damping off, you may want to rinse them in a solution of 1 part bleach to 9 parts water.
Prepare plastic or wooden plant labels or write on the containers themselves, using indelible ink pens, a china pencil, or a plain lead pencil.
Fill the containers loosely with potting mix and tap gently (don’t pack) to settle the soil.
Planting seeds
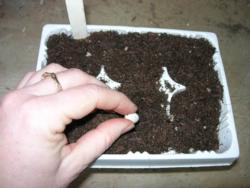
Use a chopstick or something similar to make planting holes/indentations at the right depth for your seeds. The seed packet should specify the recommended depth.In a six-pack you might want to put two seeds in each cell in case one doesn’t germinate, spaced 1/4–1/2" apart. In a flat or a pot, space the seeds about 1/2" apart.
Place the seeds carefully in the holes, cover with more potting mix, and gently firm the soil. Do not pack down.
Water with a very fine spray/mist to avoid disturbing the seeds.
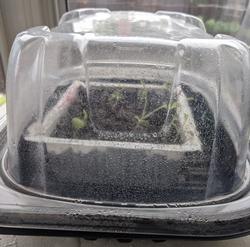
Cover the containers with plastic bags, plastic wrap, or clear domes to retain moisture. Make sure that the cover doesn't touch the soil surface.
Germinating
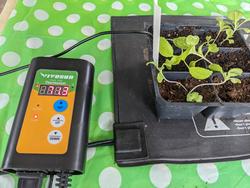
Transplants started in late winter or early spring often appreciate receiving warmth from a plant heat mat or being in a warm greenhouse or cold frame.Transplants grown in the late summer for fall planting should germinate well at outdoor temperatures and do not need or want additional heat. The seeded containers can be kept outside in a protected spot in bright indirect sunlight. Protect from insect pests or animals, if necessary.
Check daily for germination and to make sure the soil surface stays moist. When the seeds begin to germinate, remove the cover immediately.
Growing
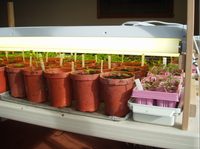
If seedlings are grown indoors, be sure to provide light once the seeds germinate. Seedlings grown with insufficient light will get thin and leggy as they reach for the light. Even a sunny window is often not enough. Using grow lights and keeping the lights just above the leaves will help you grow strong, sturdy seedlings.If seedlings are grown outdoors, give them full or slightly filtered sun exposure. When raising seedlings in the summer for fall planting, you might need to shade them from the hottest afternoon sun.
Water seedlings regularly and be careful that they don't dry out. If the soil dries out, it can become hydrophobic, meaning it will repel water and becomes difficult to rewet. A well-watered pot should feel heavy with all of the water it has absorbed.
Transplanting or thinning
When the seedlings have one or two pairs of true leaves, transplant them into six-packs or individual pots to grow to planting size.Prepare and fill the pots or six-packs as described above, but make the planting holes deep and wide enough for seedling roots.
For seedlings growing in flats: Very gently grasp a seedling by its leaves (not the stem) and use a stick or other small device to pry its roots gently out of the flat without tearing them. Still holding the tiny seedling by the leaf, transfer it to the waiting pot, easing the roots into the prepared hole. Gently push soil around the roots, so that the seedling is planted at the same height or slightly deeper than it was in the original flat. Don't pack the soil down, as this may damage the roots. Water gently to settle the soil around the roots.
For seedlings growing in six-packs: If you planted more than one seed per cell in a six-pack and all of them germinated, separate the seedlings and replant or thin them when they have one or two pairs of true leaves. To thin, use a scissors to snip off unwanted plants just above the soil line. Don’t pull them out, as this may damage the roots of the other seedling(s) in the pot. To separate them, follow instructions in the next paragraph.
For seedlings growing in a pot: If you have a pot with several tiny seedlings in it, they should be separated to grow to planting size. To do this, invert the pot of seedlings, holding your hand with your fingers spread over the top of the pot and seedlings. Tap the edge of the pot so the entire contents drops gently into your hand, then immediately turn it right side up. Drop the entire mass (seedlings are now on top) from a height of 2–3 inches onto a clean surface. The root ball will fall apart. Gently separate individual seedlings, holding them by a leaf (not the stem), and transfer them to a prepared pot or six-pack, one seedling per cell or pot, as described earlier.
Fertilize: Most commercial potting soil contains sufficient fertilizers for seedlings; but if the one you used does not, plan to fertilize the seedlings with half-strength fertilizer solution now and again after 3–4 weeks.
Hardening off
When seedlings are big enough to plant in the garden, it is best to acclimate them to the harsher conditions of the open garden by gradually increasing their exposure to full sunlight, wind, and temperature extremes. This process is called hardening off.There are no hard and fast rules. Over a period of about a week, gradually increase the time the plants are in full sun, exercising care if a day is particularly hot or windy. Be sure to keep the seedlings well watered, and avoid locations that might attract animal or insect pests.
Seedlings that have been raised indoors under artificial light will be quite tender and will need careful hardening off. Seedlings raised outdoors are sturdier and should just need a little gradual exposure to full sun before planting out.
Planting in the garden
Choose a planting day that is expected to have moderate temperatures.
Plant in the late afternoon to avoid the most intense sun.
Be sure both the planting area and the seedling are well watered before transplanting. A dry root ball can be fatal to a plant in the ground, and planting into dry soil can quickly dehydrate the root ball.
Dig a hole for the plant. If the bed has not been fertilized already, add some fertilizer to the bottom of the hole and mix into the soil.
Place your hand over the top of the pot or six-pack cell with the stem of the plant between your fingers, invert the pot, and tap or squeeze the container to loosen the plant so it will slide out. If roots are visible on the outside of the soil, gently rough up the roots on the sides and bottom.
Place in the planting hole so the soil levels are even. Gently fill in around the plant and firm it in place.
Water in well, even if the soil is moist, to settle the dirt around the plant roots.
Protection and care
If it is quite warm and/or the sunlight is intense, use row cover or temporary structures to shade the newly planted seedlings for a few days.
If your garden is visited by vertebrate pests such as squirrels, rats, or birds, protect the seedlings with netting or cages fashioned from metal screening.
If snails and slugs inhabit your garden, be sure to control them before planting or check at night to prevent damage.
Provide extra water for the first few weeks while the seedlings’ roots are getting established.
Videos
- Successful Vegetable Gardening Class 3: Seeds and Seedlings [1 hr 27 min]
- Growing from Seed: A Summer Start for Your Winter Garden [1 hr 28 min]


